
Avoid danger! Risk assessment
Risk assessment is a way to grasp whether the dangers of products and equipment made are not hidden as logical thinking.
Therefore, the risk here is not a risk of product strategy or product quality, simply speaking as a risk as “safety”.
1. Why is there a need to think about safety?
1. Manufacturer responsibility has been questioned for safety against products.
→ It can be said that designing with risk taken into account in product design is made even when it comes to a situation where responsibility is required
2. It is time to question CSR (corporate social responsibility).
→ International standards It is stipulated that manufacturing competition will be done with safety ensured as ISO
3. Large damage amount
→ It can be a civil lawsuit without having to be a criminal case. In that case, it will expand from tens of millions to billions of yen yen at the compensation responsibility
4. Can not sell overseas
It is asked whether the risk assessment was carried out even overseas certification such as CE and CCC.
It is becoming an era where supplier liability is strictly questioned
2. Why are you making noise in Japan?
Japan is still country under risk aversion ! It is!
As for what it means, there are two ways of thinking about safety design.
· Danger detectable
When it becomes dangerous, send a signal and control and display
→ In the event of a sensor malfunction or the like, it does not detect danger and it operates.
· Safety confirmation type
Only when safety is secured, signal transmission control.
In case of sensor failure or the like, it does not operate because it does not detect safety.
Japan is rather dangerous sense type of the former.
In Europe and the United States, the latter safety confirmation type is mainstream.
Because it will not move unless it is safe,
Japan is a country undergoing security measures
3. What should the designer do?
First of all, we have to make products with intrinsically safe design (not dangerous, not approaching danger, not making danger).
Nevertheless, when the danger can not be avoided by any means, the designer must make efforts to reduce the danger according to the level of the risk.
It is a risk assessment that leaves them as a form.
The level of risk in this case is as follows.
As I will explain in detail later, it is to judge correctly whether this risk level can be accepted as a company.
It is the designer’s job to use the judgment to do the following.
· Minimize risk
· Make the user recognize the risk
· Present usage without risks
Essentially it does not have risks without making risks
4. Risk assessment flow
Risk assessment is done by multiple people so as not to miss as much as possible.
I will explain the flow easily.
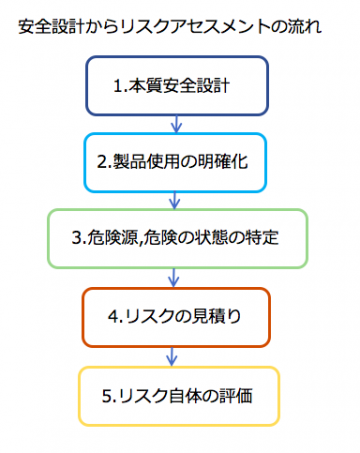
Below is a diagram of the flow of risk assessment from safety design.
We will consider as early as possible in the design stage.
Because, if it is retrofitted, it will only protect the safety guards.
→ Cost rises, maintainability, operability is affected.
1. Intrinsically safe design
· It is not dangerous
· Do not approach danger
· Do not make danger
Is it supposed to be
“1. Intrinsic Safety Design” will not be explained as it will vary depending on the product, but let’s design it so as not to be dangerous.
2. Clarification on Product Usage
· Who, when and how to handle
“2. Clarification on Product Usage” becomes important in conducting risk assessment.
· Who is the product user?
· Are there any changes in hazards depending on the operating environment?
· How do I use it?
· Is there a possibility of encountering danger other than usage?
· Who maintains the product?
· Do you encounter maintenance danger?
· Hazards do not appear as synergies when using tools and other instruments?
· Are there any risks encountered by other third parties?
As we use it, we will identify the hazards along the flow of work.
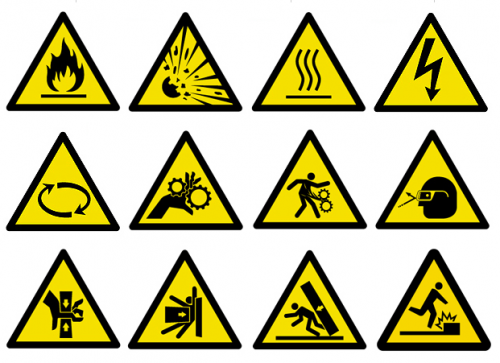
3. Identify hazards and hazardous conditions
· Type of danger: impact, entanglement, noise, vibration, electric shock etc.
· Danger status: size of disorder, frequency of contact, avoidance from danger
“3. Identification of hazards and hazardous conditions” will correctly describe the situation of hazards sources from the contents that were done in 2..
Here, the same hazards of the same part that spans use can be summarized.
However, even if it is the same part, if the type and state of danger differ, it should not be summarized.
4. Risk Estimate
· Estimate the risk level
For “4. Risk Estimation”, we will quantify each risk level from the type and state of the danger done in 3.
By numericalization, we will visualize the priority of improvement against danger.
However, since it may be influenced by the values of each designer in setting this risk level,
I think that it is better to decide certain rules in advance.
5. Evaluation of risk itself
· Determine whether it is acceptable or not for risk level
· If there is a range where the risk is unacceptable, repeat it from the beginning
“5. Evaluation of Risk itself” will decide how to respond from the risk level quantified in 4 in the future.
Depending on the value of the level, we will classify “unacceptable levels”, “remaining risk” and “acceptable levels”.
· If it is “unacceptable level”, review the design and lower the level or eliminate hazards.
· If it is “residual risk”, we will rethink the design and lower the level or notify the user of the risk and leave it as a user’s responsibility.
· If it is “acceptable level”, we will promote product design by notifying the user of the risk depending on the situation.
It is best if there is no risk to the product, but it seems that it can not be done anything to make it zero.
The following books are helpful for details of the flow of risk assessment and how to respond at the manufacturing site.
製造現場等におけるイラストで学ぶリスクアセスメント 第1集
5. Identify hazards and hazardous conditions
As I mentioned briefly earlier, after extracting hazards, we will consider risk levels one by one for hazards.
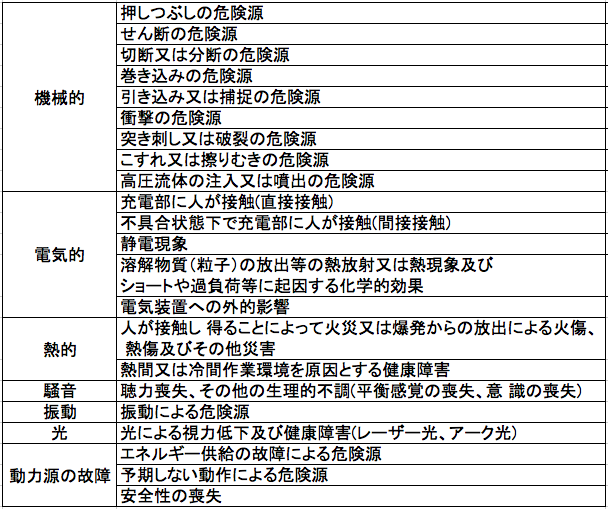
The following are the main items to look for hazards.
· Mechanical
Crushing, shearing, cutting or cutting, entanglement, retraction, impact, rubbing or scuffing, injection or ejection of high pressure fluid
· electrical
Direct contact, indirect contact, electrostatic phenomenon, thermal radiation or thermal phenomenon · short circuit, external influence on electric device
· Thermal
Burns caused by fire or explosion, burns and other disasters, causing health problems
· noise
Hearing loss, other physiological malfunction
· vibration
Hazard source by vibration
· light
Diminished vision and health problems due to light
· Failure of power source
Failure of energy supply, unexpected operation, loss of safety
These contents are not all.
Depending on the content you need to add. Also, depending on the company, I think that the contents to be prioritized and details to be viewed in detail are different.
Identifying hazards sources can lead to activities of risk reduction
6. Risk level thinking
As I explained a little bit earlier, the risk level can be expressed as follows.
However, this is one of the risk assessment methods.
As a method
· Addition method (add risk element)
The above method, the most used in Japan
· Integration method (accumulate risk factors)
Sometimes the effect of risk reduction seems to be large
· Matrix method (expression with risk as a table)
Can not be reflected in fragmented risk
· Lithograph method (Risk expressed as chart)
Risk comparison is easy. But I can not do much classification to evaluate
there is ………, ………, etc.
I will explain with addition method.
Other methods will be omitted.
Let’s explain each item of the addition method.
o Size of injury
The size of the injury will be based on “magnitude of force”, “space to escape” “range to be covered” and will create standards.
Size of force: impact, thrust, speed
Space to escape: space to relieve force
Area covered: Number of people, range of body at risk
It becomes important.
For example, “I pulled my arms in a place that was crushed to 2 mm of clearance at a speed of 5 mm / s with a force of 20000 N”
If you think, your arms will break.
But, “I got my fingers in the place where the force of 20,000 N, crushed to the gap of 300 mm at a speed of 5 mm / s”
It seems that it will not get caught when becoming. (I think impact will be added)
The concept of “escape space” and “range to be covered” is also included in the JIS standard.
As an example, the minimum clearance for avoiding crushing (JIS B 9711)
Body: 500 mm or more
Leg: 180 mm or more
Toe: 50 mm or more
Arm: 120 mm or more
Hands: 100 mm or more
Finger: 25 mm or more
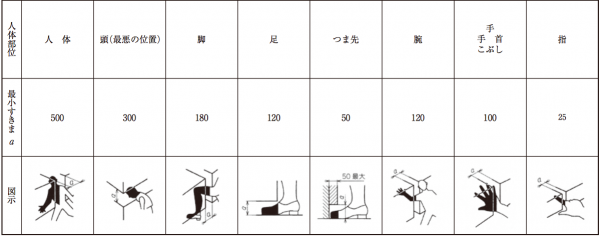
I think that it is good to refer to.
Based on these assumptions, we will classify the following.
· mortal wound : injuries leading to death or permanent labor inability
· Severe : serious injury (injury requiring long-term care) and injuries remaining
· minor injuries : accidents involving lost work and injuries (injuries that can be recovered at all)
· minor injuries : injury injuries that can return to the original work immediately after the allowance
This is an example and I think that strict numerical values and standards are different for companies, but it will look like this.
Some companies assign “injury class” on the assumption that injuries remain after the accident.

○ Contact frequency
The frequency of contact is the frequency of approaching a hazard.
I will divide it as follows as a guide.
· Frequently : 3 times or more / 1 day
· occasionally : 1 to 2 times / day
· Rarely : at least 1 / week
Again as before, I think that strict numerical values and standards are different for companies, but it will look like this.

o Probability of injury
The probability of injury will be based on “detectability of danger” and “avoidance from danger”.
The probability of occurrence of risk depends on whether it is an easy-to-understand hazard.
Danger is perceived differently in “Blade in front of you” and “Blade in place hidden behind the shadows”. Of course it also leads to avoidability.
As avoidance from danger, consider whether you can avoid or encounter hazards.
· Safety distance to prevent reach of upper limbs / lower limbs (JIS B 9718)
Distance not reaching hazards
Arm: opening 120 mm or less, distance to hazardous source 850 mm or more
Hands: opening 30 mm or less, distance to dangerous source 200 mm or more
Fingertip: opening 6 mm or less, distance to dangerous source 10 mm or more
Leg: opening 95 mm or less, distance to hazardous source more than 1100 mm
Below is an illustration of an arm case
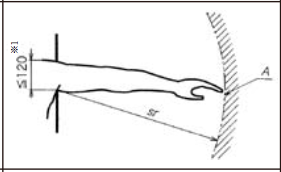
· Response time of safety guards (JIS B 9715)
S = (K * T) + C
S: Distance from detection point to hazard source, K: Part approach speed (upper limb 2000 mm / s), T: Time to eliminate hazards, C:
If this is a detection device, if the safety protection device is activated or the machine is stopped and the hazards are gone, consider using this formula.
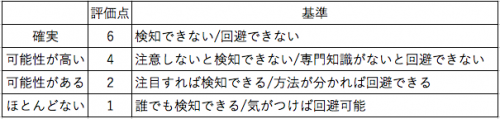
Based on these, we will divide it as follows.
· certainty : can not detect / can not be avoided
· highly likely : can not be detected unless careful / can not be avoided without expert knowledge
· There is a possibility : It can be avoided if you can recognize by noticing / knowing a method
· Almost none : Anyone can detect it / Avoid it if you notice it
I think that it is necessary to decide how to avoid and detect how to detect hazards.
Again as before, I think that strict numerical values and standards are different for companies, but it will look like this.
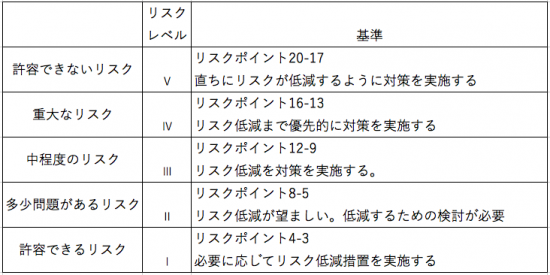
○ Risk level
We add the score so far and figure out the risk level.
Respond according to risk level.
· Ⅴ: unacceptable risk
Risk points 20 – 17, Implement measures to immediately reduce the risk
· IV: serious risk
Risk points 16 – 13, prioritize measures to reduce risk
· Ⅲ: moderate risk
Risk points 12 – 9, implement measures to reduce risk.
· Ⅱ: Somewhat problematic risk
Risk point 8-5, risk reduction is desirable. Study to reduce it is necessary
· Ⅰ: acceptable risk
Risk point 4-3, implement risk reduction measures as necessary
Again as before, I think that strict numerical values and standards are different for companies, but it will look like this.
By implementing these, designs that reduce risk as much as possible will be designed to approach intrinsically safe.
Risk assessment can reduce risk as much as possible
Details of the flow of risk assessment and how to deal with the manufacturing site are easy to understand below.